How To Install Overhead Kitchen Cabinets : How to Install Kitchen Cabinet Crown Molding | how-tos | DIY : Place a block at regular intervals every 12 in (30 cm).
How To Install Overhead Kitchen Cabinets : How to Install Kitchen Cabinet Crown Molding | how-tos | DIY : Place a block at regular intervals every 12 in (30 cm).. Remove the sink, countertop, moulding and toe kicks on the existing cabinetry. Then secure the cabinets to the wall with large screws. Ya don't need but 16 or so inches between counter top and lower edge of upper cabs. You need one brace for the end of each cabinet and one for the center of each cabinet over 12 inches wide. Hanging upper kitchen cabinets is the next step in this series.
Installing crown molding on kitchen cabinets is one project that takes a little bit of skill but is totally doable. I would like to add some overhead cabinets over the peninsula. Definitely go to the ceiling! Ceiling height cabinets make a kitchen look cohesive and high end. Get detailed instructions on installing wall cabinets in any room, here:
4 - CliqStudios Kitchen Cabinet Installation Guide Chapter 4 - YouTube from i.ytimg.com It's obviously much simpler to install the pieces of 1×2 before you get the cabinets in, but it's doable afterwards. Tip the poplar props up underneath the cabinet; (see below for a shopping list, tools, and. My dad said that it would be much easier to use pieces of 1×2 strapping instead of a 2×4 since it would be lighter and easier to attach. Ceiling height cabinets make a kitchen look cohesive and high end. Remove the doors and drawers from your cabinets and then disconnect and remove your appliances. Place the corner cabinet into position on the wall stud marking. Ya don't need but 16 or so inches between counter top and lower edge of upper cabs.
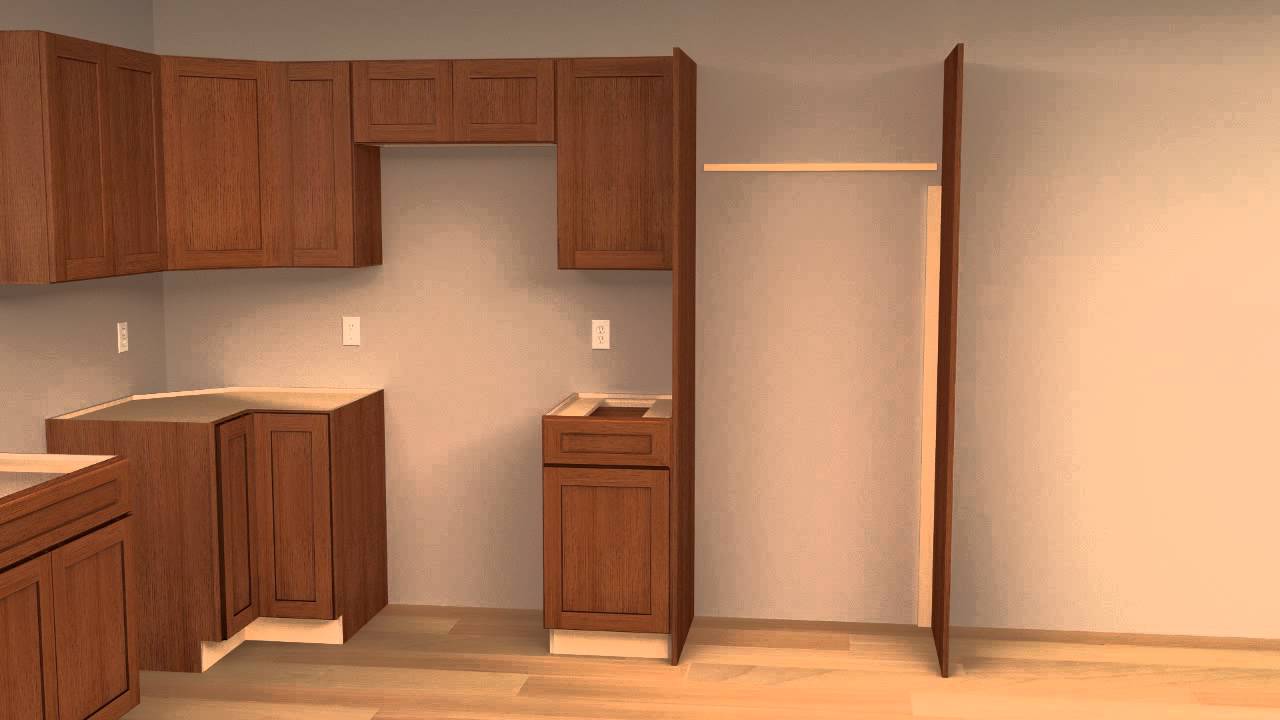
Start with a corner wall cabinet place the corner wall cabinet on the screws or ledger.
Drop those 42 puppies down on the wall a little bit and put a nice crown on cabs. Carefully remove the screws with a nut driver bit attached to a cordless drill. Stick 2 1⁄2 in (6.4 cm) screws in the holes, then tighten them with a cordless screwdriver. When planning a new kitchen or major remodel, a key decision you'll need to make is whether to run the upper wall cabinetry all the way to the ceiling or to install cabinets with a gap above them. Tip the poplar props up underneath the cabinet; #1 install more overhead cabinets firstly, one of the best ways to make use of the vertical space you currently have is by simply installing more overhead cabinets in your kitchen. Once these screws are in place, the cabinet is capable of supporting its weight. However, being a peninsula, there is no wall to which i could mount or anchor the cabinets. My dad said that it would be much easier to use pieces of 1×2 strapping instead of a 2×4 since it would be lighter and easier to attach. Sure, some might argue that it will look a bit cluttered, but with a bit of proper planning and layout beforehand, you can easily add a few more and really elevate. Remove the sink, countertop, moulding and toe kicks on the existing cabinetry. With an upper cabinet mounting height of 54 inches, the top of the upper cabinets would sit at 84 or 90 inches off the ground for the. A ledger is a board that helps support the cabinetry as you work.
See how i raised our kitchen cabinets to the ceiling and added a floating shelf underneath to maximize storage space in our small kitchen.find all of my $350. Cabinets are sold in standard heights of 30, 36, or 42 inches. A ledger is a board that helps support the cabinetry as you work. If needed, insert a shim to make it level and flat to the wall. For all the advantages of ceiling height cabinets, there are also a few disadvantages.
Installing Crown Molding On Uneven Cabinets | www.cintronbeveragegroup.com from cdnassets.hw.net (see below for a shopping list, tools, and. Level and set the boxes kitchen floor cabinets photo 2: Find the studs in the wall behind the cabinet and mark their positions on the cabinet. Place a block at regular intervals every 12 in (30 cm). Definitely go to the ceiling! How to install kitchen cabinets step 3: Then, take 1 in (2.5 cm) x 2 in (5.1 cm) wood strips and attach them to the top of the cabinets with wood glue. Use a level to ensure your cabinets are installed accurately.
For sure don't make a dust catcher with 36 cabs!
Continue with this technique around the rest of the kitchen, cutting inside and outside miters at the normal miter angle, and rolling the crown up or down so that it meets the vertical height needed to maintain. They aren't easy to access Drill a pair of 1⁄8 in (3.2 mm) holes from the cabinet's frame to the filler strip. Level and set the boxes kitchen floor cabinets photo 2: Once these screws are in place, the cabinet is capable of supporting its weight. Turn off the electrical, gas and plumbing/water supply lines to the kitchen. Stick 2 1⁄2 in (6.4 cm) screws in the holes, then tighten them with a cordless screwdriver. If the cabinet isn't plumb, slip shims between the cabinet and wall at the stud lines and adjust as necessary. With an upper cabinet mounting height of 54 inches, the top of the upper cabinets would sit at 84 or 90 inches off the ground for the. In this video from bunnings warehouse on how to install kitchen wall. Cabinets are sold in standard heights of 30, 36, or 42 inches. Position the first cabinet set the first cabinet 1/4 in. Definitely go to the ceiling!
Tip the poplar props up underneath the cabinet; Many people think of a kitchen as more beautiful and luxurious when there are ceiling height cabinets. From the positioning line and shim the base until the top is even with the horizontal line and level from front to back. If needed, insert a shim to make it level and flat to the wall. Anchor the island cabinets to the 2x2s with screws.
How to Install Ceiling Mounted Kitchen Cabinets | eHow from cpi.studiod.com Sure, some might argue that it will look a bit cluttered, but with a bit of proper planning and layout beforehand, you can easily add a few more and really elevate. Cabinets are sold in standard heights of 30, 36, or 42 inches. They aren't easy to access Essentially, you want to measure the depth of the cabinet. #1 install more overhead cabinets firstly, one of the best ways to make use of the vertical space you currently have is by simply installing more overhead cabinets in your kitchen. Drop those 42 puppies down on the wall a little bit and put a nice crown on cabs. Lower the cabinets away from the. Crown molding can give your cabinets an extra air of charm and sophistication.
Crown molding can give your cabinets an extra air of charm and sophistication.
Drill a pair of 1⁄8 in (3.2 mm) holes from the cabinet's frame to the filler strip. Position the first cabinet set the first cabinet 1/4 in. Carefully remove the screws with a nut driver bit attached to a cordless drill. For sure don't make a dust catcher with 36 cabs! With an upper cabinet mounting height of 54 inches, the top of the upper cabinets would sit at 84 or 90 inches off the ground for the. Essentially, you want to measure the depth of the cabinet. Start with a corner wall cabinet place the corner wall cabinet on the screws or ledger. Crown molding can give your cabinets an extra air of charm and sophistication. Lower the cabinets away from the. To begin kitchen island installation, first trace an outline of the cabinets on the floor. There are dozens of sizes and patterns to choose from, and you can even combine multiple moldings for a chunky look. See how i raised our kitchen cabinets to the ceiling and added a floating shelf underneath to maximize storage space in our small kitchen.find all of my $350. Installing crown molding on kitchen cabinets is one project that takes a little bit of skill but is totally doable.